Monday, November 10, 2014

Create Dynamic Google Map using Javascript

Why do we need to use Javascript to generate Google map dynamically? The answer is speed. If we tell our browser to load everything at the same time, everything will be loaded slower compared to letting browser to complete the important ones before the non-critical one such as the Google map.

I've done some testing and it shows that Google is slowing down the loading of other items on a web page. I compare the loading time of a web page with and without Google map. The one with concurrent Google map loading is showing up images much slower than the one without.

So I've decided to use Javascript to load the Google map dynamically only after all the images are loaded on a web page.

Here are the example for the Google map to be loaded only after the web page body is loaded:


<html>
<head>
<style>
#map_canvas {
width: 500px;
height: 400px;
}
</style>
</head>
<script src="https://maps.googleapis.com/maps/api/js"></script>
<script>
function initialize() {
 var myLatlng = new google.maps.LatLng(40.689452, -74.044521);
 var map_canvas = document.getElementById('map_canvas');
 var map_options = {
  center: new google.maps.LatLng(40.689452, -74.044521),
  zoom: 11,
  width: 500,
  height: 400,
  mapTypeId: google.maps.MapTypeId.ROADMAP
 }
  var map = new google.maps.Map(map_canvas, map_options);
 var marker = new google.maps.Marker({
  position: myLatlng,   map: map,
  title: 'Statue of Liberty'
 });
 google.maps.event.addDomListener(map_canvas, 'load', initialize);
}
</script>
</head>
<body onload="initialize()">
<div id="map_canvas"></div>
</body>
</html>


Of course, you need to place the initialize() function to the location that you think it is the best time to load the Google map. For this case, I choose to place it in the onload listener in the BODY tag. You can change the size and zoom level according to your need.

If you want to load only after certain image is loaded, you can check out my tutorial on how to use Javascript to check whether an image is loaded here.

Read More »

Tuesday, October 28, 2014

onload Priority for Chrome, Safari, Firefox and Internet Explorer

I always wonder how the location of the placement of onload event listener will affect the behavior of my Javascript on various browsers. I use the following codes to check out this small doubt of me:


<html>
<head>
<script>
window.onload = function() {
 alert("window.onload in the head");
}
</script>
</head>

<body onload="alert('body begins onload')">
<br><br><br><br><br><br>
<script>
 alert("body ends onload");
</script>
</body>
</html>


The following are the results of the test on various browser according to the priority of the alert message:
Chrome: "body ends onload", "window.onload in the head", "body begins onload"
Safari/Firefox/IE: "body ends onload", "body begins onload"

I then add an extra onload listener in the body to see if it changes the result. The codes are as follows:


<html>
<head>
<script>
window.onload = function() {
 alert("window.onload in the head");
}
</script>
</head>

<body onload="alert('body begins onload')">
<script>
window.onload = function() {
 alert("window.onload in the body");
}
</script>
<br><br><br><br><br><br> <script>
 alert("body ends onload");
</script>
</body>
</html>


The following are the results of the test on various browser for this new tweak:
Chrome: "body ends onload", "body begins onload", "window.onload in the body"
Safari/Firefox/IE: "body ends onload", "window.onload in the body"


CONCLUSION:
The Chrome browser behave slightly different from the pack. If the window.onload listener is in the head, it will have higher precedence over the onload in the body tag. If the window.onload is in the body, it will have less priority than the one in the body tag with the one in the head ignored.

As for the other browsers, the window.onload in the body will replace the one in the body tag.

One needs to pay special attention to Chrome as it will take all the onload listener in HTML seriously and the programmer needs to make sure the onload script is not running the same script twice or more.

Read More »

Monday, October 13, 2014

Javascript to Simulate Shaking an Object

I know this is trivial but also fun at the same time. Just in case you need something fun for your school projects. You need to modify it to suit your need as the codes in the following is very minimal:


<html>
<script>

var x = 10;
var y = 10;
var myTimer;

function startshake() {
 setTimeout(function() {moveElemX("shakeObject",x-(Math.floor(Math.random()*6)));},10);
 setTimeout(function() {moveElemX("shakeObject",x+(Math.floor(Math.random()*7)));},25);
 setTimeout(function() {moveElemX("shakeObject",x-(Math.floor(Math.random()*5)));},40);
 setTimeout(function() {moveElemX("shakeObject",x+(Math.floor(Math.random()*6)));},55);
 setTimeout(function() {moveElemX("shakeObject",x-(Math.floor(Math.random()*8)));},70);
 setTimeout(function() {moveElemX("shakeObject",x);},85);
 setTimeout(function() {moveElemY("shakeObject",y-(Math.floor(Math.random()*7)));},15);
 setTimeout(function() {moveElemY("shakeObject",y+(Math.floor(Math.random()*3)));},35);
 setTimeout(function() {moveElemY("shakeObject",y-(Math.floor(Math.random()*5)));},45);
 setTimeout(function() {moveElemY("shakeObject",y+(Math.floor(Math.random()*7)));},65);
 setTimeout(function() {moveElemY("shakeObject",y-(Math.floor(Math.random()*5)));},80);
 setTimeout(function() {moveElemY("shakeObject",y);},95);
}


function stopshake() {
 clearInterval(myTimer);
 document.getElementById(elemName).style.top = y+"px";
 document.getElementById(elemName).style.left = x+"px";
}

function moveElemX(elemName,X) {
 document.getElementById(elemName).style.left = X+"px";
}

function moveElemY(elemName,Y) {
 document.getElementById(elemName).style.top = Y+"px";
}


</script>
<body>

<span id="shakeObject" style="position:absolute;top:10px;left:10px">
<table bgcolor="#ffff22" cellpadding=2 cellspacing=2 align=center valign=middle><tr><td>Telephone</td></tr></table>
</span>

<script>
myTimer = setInterval("startshake()",1000);
</script>

<br><br><br>
<a href="javascript:stopshake()">Stop Shaking</a>
</body>

</html>


This is just an example. There are still many other ways to do it. You can also change the timer or offset to other values that suit your need. Hope you like it!

Read More »

Monday, October 6, 2014

Fixed DIV for Browsers (Including IE and Tablets) using CSS

Without using Javascript, CSS is enough to do the job:


<!DOCTYPE HTML>
<html>

<style type="text/css">
#fixit { position: absolute; left: 10px; top: 10px; }
div > div#fixit { position: fixed; }

</style>

<body>

<div>
<div id="fixit" style="border:2px solid #333;background-color:#ddd;text-align:center;padding:10px;"> Hello </div>
</div>

<br><br><br><br><br><br><br><br><br><br><br><br><br><br><br><br><br><br><br><br><br><br><br><br><br><br><br><br><br><br><br><br><br><br><br><br><br><br><br><br><br><br><br><br><br><br><br><br><br><br><br><br><br><br><br><br><br><br><br><br><br><br><br><br><br><br><br><br><br><br><br><br><br><br><br><br><br><br><br><br>
</body>
</html>


Try scrolling the page. The "Hello" tag won't move. Please pay attention to those in green. Especially the DOCTYPE declaration.
Read More »

Sunday, August 31, 2014

Turn PHP Output Buffer Off to Make it Live on IIS


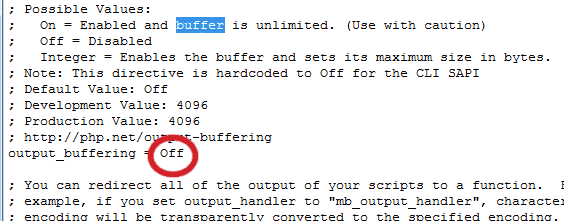
Questions will be raised on why we need such a trivial feature on our machines? The answer is simple, we want to turn our browser into a server console. When we deal with a extremely large database and we use PHP to process it, we really need the live update on the browser to see the progress as it may take a few hours to complete. Especially when it comes to debugging the PHP during the MySQL processing, any problem will be immediately spotted if it is being run live. If not, you may only realize there is a bug in your program hours later. Then you need to wait for a few more hours to find out more about the outcome again. Live update of browsers will come in handy for cases like I mentioned.

The method:

Change two things in php.ini in c:\Program Files (x86) folder.

1. output_buffering = Off
2. max_execution_time = 0

NOW REMEMBER TO REBOOT YOUR PC!


There are a lots of recommendations on the web such as changing certain values in IIS (PHP-CGI) and using flush() or ob_flush() in PHP. I've tried them. They don't work.

However, the following codes need to be used to clear the buffer before the PHP can become live:


<?php

ob_implicit_flush();
header("Content-Type: text/html");

for ($i=0; $i < 4150; $i++) {
  echo ' ';
}

// The following is not needed as it is just to make sure your PHP can go live.

for($i=0; $i < 5; $i++){
  echo $i . '<br>';
  sleep(1);
}

?>


Why 4150? I've done some testings on two machines and it seems that the number has to be more than 4096 (default buffer size). 4150 seems to be OK on both machines although one machine can go as low as 4130.


If you running PHP on IIS, you'll need to set your IIS to allow the execution of PHP to run longer. Here are the steps to set the IIS (Windows 7):


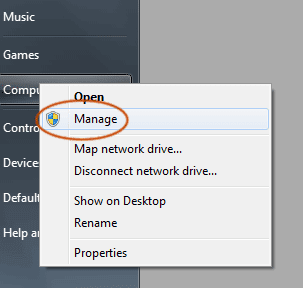
Start->My Computer (Right Click)


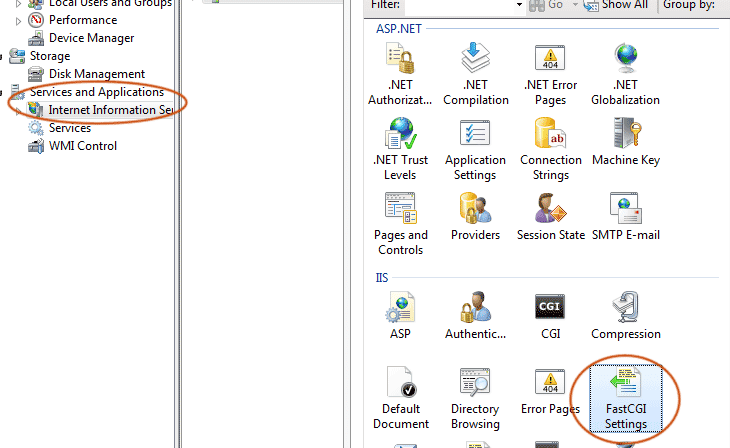
IIS->FastCGI Settings


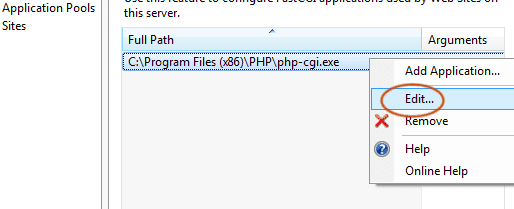
Double Click on the FastCGI exe file or right click -> Edit.


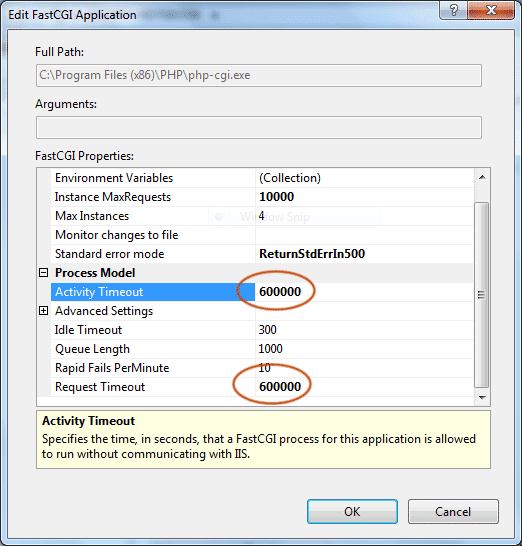
Set the Activity and Request Timeout value to higher number (in seceonds).

Restart your PC.

Read More »

Tuesday, August 19, 2014

Drawing Line Using Javascript (with Anti-alias Smoothening)


Caveat: It will not look good if the line is steep. Extra work is required to fix this script to render good steep lines.

This is my in-house recipe for anti-alias smoothening of line drawing using Javascript. It is not perfect and it is mainly for educational purposes. It might not be suitable for commercial web sites. If you don't want the anti-alias feature, you can try my plain line drawing Javascript.

Here we go:


<html>

<script>

var spanTag,spanTag1,spanTag2;
var red,red1,red2;
var green,green1,green2;
var blue,blue1,blue2;
var colorChannel;

function mkDotAS(x,y,color,aliasingFactor) {

  colorChannel = color.match(/\#(\w\w)(\w\w)(\w\w)/);

  red = parseInt(colorChannel[1],16);
  green = parseInt(colorChannel[2],16);
  blue = parseInt(colorChannel[3],16);

  red1 = red + parseInt((255-red) * aliasingFactor);
  green1 = green + parseInt((255-green) * aliasingFactor);
  blue1 = blue + parseInt((255-blue) * aliasingFactor);
  red1 = red1>255?255:red1; green1 = green1>255?255:green1; blue1 = blue1>255?255:blue1;

  red2 = red + parseInt((255-red) * (1-aliasingFactor));
  green2 = green + parseInt((255-green) * (1-aliasingFactor));
  blue2 = blue + parseInt((255-blue) * (1-aliasingFactor));
  red2 = red2>255?255:red2; green2 = green2>255?255:green2; blue2 = blue2>255?255:blue2;

  spanTag = document.createElement("span");
  spanTag.innerHTML = '<img src="dummy1x1.png" height=1 width=1>';
  spanTag.style.position = "absolute";
  spanTag.style.zIndex = 1;
  spanTag.style.left = x + "px";
  spanTag.style.top = y + "px";

  spanTag1 = document.createElement("span");
  spanTag1.innerHTML = '<img src="dummy1x1.png" height=1 width=1>';
  spanTag1.style.position = "absolute";
  spanTag1.style.zIndex = 1;
  spanTag1.style.left = x + "px";
  y--;
  spanTag1.style.top = y + "px";

  spanTag2 = document.createElement("span");
  spanTag2.innerHTML = '<img src="dummy1x1.png" height=1 width=1>';
  spanTag2.style.position = "absolute";
  spanTag2.style.zIndex = 1;
  spanTag2.style.left = x + "px";
  y+=2;
  spanTag2.style.top = y + "px";

  red = red>=16?red.toString(16):"0"+red.toString(16);
  green = green>=16?green.toString(16):"0"+green.toString(16);
  blue = blue>=16?blue.toString(16):"0"+blue.toString(16);

  red1 = red1>=16?red1.toString(16):"0"+red1.toString(16);
  green1 = green1>=16?green1.toString(16):"0"+green1.toString(16);
  blue1 = blue1>=16?blue1.toString(16):"0"+blue1.toString(16);

  red2 = red2>=16?red2.toString(16):"0"+red2.toString(16);
  green2 = green2>=16?green2.toString(16):"0"+green2.toString(16);
  blue2 = blue2>=16?blue2.toString(16):"0"+blue2.toString(16);

  spanTag.style.backgroundColor = "#"+red+green+blue;
  spanTag1.style.backgroundColor = "#"+red1+green1+blue1;
  spanTag2.style.backgroundColor = "#"+red2+green2+blue2;

  document.body.appendChild(spanTag);
  document.body.appendChild(spanTag1);
  document.body.appendChild(spanTag2);
}

function drawLineAS(x1,y1,x2,y2,color) {

  var i,j,x,y,m,d,done=0;
  var intMx,floatMx,diff=0;
  x=Math.abs(x1);
  y=Math.abs(y1);
  m=(y2-y1)/(x2-x1);
  d=x1>x2?"-":"+";
  c=y1-(m*x);
 
  while (!done) {
   mkDotAS(x,y,color,diff);
   if (x==x2) { done = 1; }
   if (d=="-") { x--; }
   else { x++; }

   y = parseInt(m*x) + c;
   floatMx = m*x; intMx = parseInt(m*x); diff = floatMx-intMx;
  }
}

window.onload = function() { // only can call after the body is loaded
  drawLineAS(10,40,1000,320,"#3388cc");
};

</script>

<body>
...
</body>

</html>


Actually, this is quite similar to my non-anti-alias version. You can refer to my earlier post on the basic of line drawing using Javascript. To make the story short, a picture worths a thousand words:


Beside the original non-anti-alias line, I just add the spanTag1 and spanTag2 which respectively being placed 1 pixel above and below the original non-anti-alias line. spanTag1 and spanTag2 are the lighter version of the original pixel. The brightness depends on the difference between the floating number of m*x and the integer number of m*x. Since our screen cannot take floating number, the integer number or rounded number offers an inaccurate representation of the actual line. The difference (between floating and integer of m*x) is then being used to calculate the intensity of the lighter version of original pixel color. The one above and the below are being made to be complementing each other to make up a complete bright pixel. This means that if the one above is 25% brighter, the one below will be 75% brighter and vice versa. It is a bit hard to explain, but here it is. I hope this post is clear enough for those who want to know the basic of anti-aliasing for line drawing. Enjoy!

P.S.: In order for the above example to work, you need to place the dummy1x1.png in the same folder you running the HTML. You can get the dummy transparent 1x1 pixel image here if you don't image editing software to help you.

Read More »

Drawing Line Using Javascript


Updated on 27th of August: Please use the 2nd version of my drawLine() function (scroll to the bottom of this page) if possible. The first version has a lots of flaws which may not draw the line correctly in certain situation.


With HTML5 coming hot and jQuery to be well received by web developers, Javascript is now a frozen cake from the fridge. Especially when it comes to drawing shapes on browsers, Javascript will be receiving less and less focus especially when HTML5 flocks into web applications someday.

Although Javascript is becoming less and less important, I still post my way of drawing lines on browsers using Javascript due to the fact that Javascript is still a good educational language for beginners to start with. The readability of jQuery is too low and may turn some newcomers away. That is why I still insist on posting Javascript goodies here. Hope this last piece of cake does not end up in the dumpster.

Note: The anti-alias version can be found here.

Here we go (the codes):


<html>

<script>

var spanTag,red,green,blue; // declare these as global
var colorChannel; // to save resources

function mkDot(x,y,color) {

  colorChannel = color.match(/\#(\w\w)(\w\w)(\w\w)/); // match out RGB
  red = parseInt(colorChannel[1],16);
  green = parseInt(colorChannel[2],16);
  blue = parseInt(colorChannel[3],16);

  spanTag = document.createElement("span");
  spanTag.innerHTML = '<img src="dummy1x1.png" height=1 width=1>';// You need a 1x1 dummy transparent PNG image as foreground
  spanTag.style.position = "absolute";
  spanTag.style.zIndex = 1; // In case you have other elements on the same page
  spanTag.style.left = x + "px";
  spanTag.style.top = y + "px";

  red = red>=16?red.toString(16):"0"+red.toString(16); // convert to HEX
  green = green>=16?green.toString(16):"0"+green.toString(16);
  blue = blue>=16?blue.toString(16):"0"+blue.toString(16);
  spanTag.style.backgroundColor = "#"+red+green+blue; // set background color

  document.body.appendChild(spanTag);
}

function drawLine(x1,y1,x2,y2,color) {
  var i,j,x,y,m,d,done=0;
  x=Math.abs(x1);
  y=Math.abs(y1);
  m=(y2-y1)/(x2-x1);
  d=x1>x2?"-":"+";
  c=y1-(m*x); // trigonometry

  while (!done) {
   mkDot(x,y,color);
   if (x==x2) { done = 1; }
   if (d=="-") { x--; }
   else { x++; }
   y = parseInt(m*x) + c; // trigonometry
  }
}

window.onload = function() { // only can call after the body loaded
  drawLine(10,40,1000,320,"#3388cc");
};

</script>

<body>
...
</body>

</html>


In case you need the dummy1x1.png, here it is https://drive.google.com/file/d/0B2RFpjH4zL5bTm9TdVo3UFUzRTg/edit?usp=sharing.


My second version (without discontinued steep line problem):


<script>

function drawLine3(x1,y1,x2,y2,color) {

 var x,y,i,m,steep,d,done=0;
 x1=Math.abs(x1);x2=Math.abs(x2);y1=Math.abs(y1);y2=Math.abs(y2);
// make sure no negative points

 if (x1>x2) { // swap xy if 1st point is on the right
  i=x1;x1=x2;x2=i;
  i=y1;y1=y2;y2=i;
 }
 d = y1>y2?1:0; // d = downward
 x=x1;
 y=y1;
 m=(y2-y1)/(x2-x1);
 c=y1-(m*x);
 steep=Math.abs(m)>1?1:0; // if steep, draw more y pixels, else more x pixels

 while (!done) {
  mkDot(x,y,color);
  if (steep) {
   if (y==y2||x==x2) { done = 1; }
   d?y--:y++;
   x = parseInt((y - c)/m);
  }
  else {
   if (x==x2) { done = 1; }
   x++;
   y = parseInt(m*x) + c;
  }
 }
}

</script>


I've just used this improved version to draw this! (Of course with a lots of other codes such as JSON parsers/generator... sent from mySQL chart data) Isn't it cool?


Read More »

Friday, August 15, 2014

Javascript to Prevent Selecting Texts on Tabled Buttons


It is now a common phenomenon that HTML tables are made buttons to replace conventional image-based buttons. The benefits of tabled buttons are quick loading, good button quality when zoomed on tablets and easy to change color. There is also no need to perform pre-loading.

This new popular method of displaying buttons can sometimes perform awkwardly if the text selection is not turned off on the tabled button. The following shows my javascript of disabling the text selection on a table.


<table>
<tr>

<td width=100 bgcolor=yellow id=box1 onclick="func1()" onmouseover="over(this)" onmouseout="out(this)" align=center>Box 1</td>
<td width=100 bgcolor=yellow id=box2 onclick="func2()" onmouseover="over(this)" onmouseout="out(this)" align=center>Box 2</td>

</tr>
</table>

<script>

document.getElementById('box1').onselectstart = function() {return false;};

function func1() {
 alert('Box 1');
}

function func2() {
 alert('Box 2');
}

function over(elem) {
 elem.style.backgroundColor = "#ccddff";
 elem.style.cursor = "pointer";
}

function out(elem) {
 elem.style.backgroundColor = "yellow";
 elem.style.cursor = "default";
}


</script>


The screen capture of this HTML being run on browser:


Note that if your mouse is trying to select on "Box 1", it won't work. But it works for "Box 2", as the selection feature is not disabled by the Javascript.
Read More »