I encounter this today that the Javascript var top cannot be used in Chrome.
Weird. It works well in Safari and IE. In Chrome, the variable name is stored as [Object Window].
Solution: Just rename top variable to something else.
Read More »
Monday, August 20, 2012

PHP to Replace Last Character in a String
Seems like a trivial code but it's nice to put it here as I tend to forgot the syntax from time to time:
$line = preg_replace("/\n$/","",$line); // To replace last newline character
$line = preg_replace("/\r\n$/","",$line); // To replace last newline character in Windows environment
$line = preg_replace("/\s$/","",$line); // To replace last space in a string
Assuming your string is stored in $line.
Read More »
$line = preg_replace("/\n$/","",$line); // To replace last newline character
$line = preg_replace("/\r\n$/","",$line); // To replace last newline character in Windows environment
$line = preg_replace("/\s$/","",$line); // To replace last space in a string
Assuming your string is stored in $line.
Sunday, August 5, 2012
Protect Your CSS and Javascript Codes
Update 20th of March 2013: Here's a updated version to include a simple minification before sending your Javascript / CSS codes to the browser especially Chrome:
http://webtrick101.blogspot.com/2013/03/protect-your-external-css-and.html
Actually there is no 100% way to protect your CSS and Javascript codes as if the person who intended to copy is using Google Chrome browser, your codes will be shown no matter how you protect them. But there is a good thing about protecting your CSS and Javascript codes. Google Chrome won't display the comments or 100% your original codes. Your codes will be made conformed to Chrome standard before being displayed. Without the 100% original codes, the intruder won't be able to copy your codes that easily.
Here's how you use Chrome to view any CSS and Javascript:
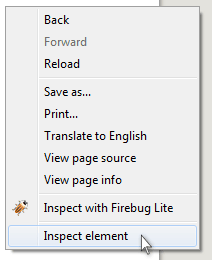
Simply right click on any webpage
Google Chrome's Inspect Element facility can inspect anything on a web site including your protected CSS and Javascript. Anyway, it is still a good practice to protect your CSS and Javascript if you think your hardwork should be protected and shared only someone asks you nicely for the codes. Here they are in the following.
The HTML:
. . . <link rel="stylesheet" type="text/css" href="mycss.php"> <script language="JavaScript" src="myjs.php"></script> . . . |
The PHPs:
For mycss.php: <?php error_reporting(0); // make sure it is not reporting any warning that will ruin the output if (preg_match('/xxx.xxx.xxx.xxx/',$_SERVER['REMOTE_ADDR'])) { print<<<MYCSS a {text-decoration:none;color:#777777;} . . . MYCSS; } ?> For myjs.php: <?php error_reporting(0); // make sure it is not reporting any warning that will ruin the output if (preg_match('/xxx.xxx.xxx.xxx/',$_SERVER['REMOTE_ADDR'])) { print<<<MYJS var ie=0; . . . MYJS; } ?> |
You can also use $_SERVER['REMOTE_HOST'] if your shared server keeps on changing the IP address. You need to use your Domain Name instead of the xxx.xxx.xxx.xxx (IP Address) above.
Saturday, August 4, 2012
Setting Permission for PHP/IIS Environment Especially When PHP Temporary File Facility Is Used
When PHP is run on IIS platform, users will run into the following problems:


You can use the search of 'tmp' and you'll find it in the first search result. Then set the php.ini according to your need. You can also set it to C:\WINDOWS\Temp but you need to grant the permission for PHP to store the temporary file here.
Read More »
- (A) Files are not able to be written, created, or rewritten on the C:\inetpub\wwwroot\ directory.
- (B) PHP uploaded temporary file will not be able to be written and this results in file upload problem. For example, $_FILES["FileID"]["tmp_name"] will not be able to be written.
- (C) PHP tmpfile() command will fail.

- Go the folder you want the permission changed to IIS/PHP friendly settings. Right click on the folder and select Properties.
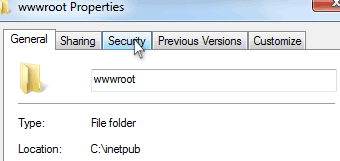
- Select the Security Tab.
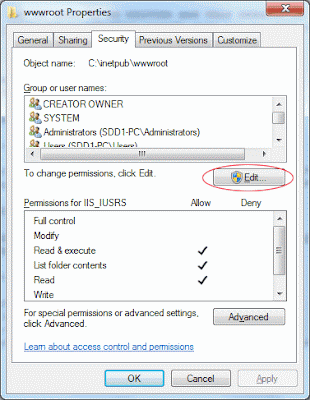
- Click on Edit as indicated above. (There's no need to select Group or User at this point)

- Refer to the screen capture above, select Users(YourComputerName\Users). Then check the Full Control Allow and then click on Apply.
- Repeat Step D above but this time, select IIS_IUSRS(YourComputerName\IIS_IUSRS) (4). Then as in step D, check the Allow for Full Control (2) then Apply (3). Press OK and then OK again.


You can use the search of 'tmp' and you'll find it in the first search result. Then set the php.ini according to your need. You can also set it to C:\WINDOWS\Temp but you need to grant the permission for PHP to store the temporary file here.
Sunday, July 15, 2012
Save Your PHP in UTF-8 Format Without BOM
BOM or byte order mark is to indicate the byte order of your file.
If your PHP file contains non-English characters, UTF-8 formatted PHP file will display as question mark(?) if the PHP script is run on Linux/Apache web service platform. However, no problem is found on Windows/IIS web servers.
You can run the following PHP codes to check whether your PHP got BOM:
If you see BOM in your UTF-8 PHP file, you'll need to convert to non-BOM format. You can easily fix it by editing using Notepad++. After opening your BOM PHP file, go to the "Encoding" menu and choose "Encode in UTF-8 without BOM". Then save the file.

Your PHP can now output non-English texts without any problem!
P.S.: (update on 18th of July 2012) You need to upload to the server as ASCII formatted file. I missed out this important info earlier. Sorry.
Read More »
|
<?php
$handle = fopen('yourfilename.php','r'); $bom = fread($handle, 3); if (empty($bom)) { echo("Error"); } else if ($bom === chr(0xef).chr(0xbb).chr(0xbf)) { // UTF8 Byte Order Mark present echo("BOM"); } else { echo("No BOM"); } ?> |
If you see BOM in your UTF-8 PHP file, you'll need to convert to non-BOM format. You can easily fix it by editing using Notepad++. After opening your BOM PHP file, go to the "Encoding" menu and choose "Encode in UTF-8 without BOM". Then save the file.

Your PHP can now output non-English texts without any problem!
P.S.: (update on 18th of July 2012) You need to upload to the server as ASCII formatted file. I missed out this important info earlier. Sorry.
Adding PHPExcel PEAR Library in Shared Hosting Environment
You need to have the PEAR library installed in your shared host/server before this. If you haven't done so, you can check out my earlier post on how to do this.
The Steps I used:
Note: If your PHP file above (to test the PHPExcel library), contains non-English character, you'll need to save it in non-BOM format preferably saved using Notepad++. Here's my post to address this fix.
As for the RELATIVE_PATH_TO_YOUR in red above, RELATIVE is the key. If you PHP file is in a subdirectory and your PEAR's root is in another subdirectory, you need to find a path to refer to PEAR. For example, if your testPHPExcel.php is in the /test directory and your PEAR is in /PEAR directory, you'll need this relative path such as ./../PEAR/.
You are done here! Enjoy!
Read More »
The Steps I used:
- You can download the PHPExcel here. Choose the PEAR version. As of now, the current version is 1.77 and the file size for the .tgz file is 11.7MB.
-
Extract the .tgz file. You'll see a PHPExcel.php and a PHPExcel folder. Like other PEAR add-ons, you just need to copy the PHP file and the folder to your PEAR root directory. You can find out the root directory during the installation of PEAR. You can also refer to my earlier post on this.
-
Upload the above mentioned PHP file and its folder to your shared server.
-
Test your PEAR PHPExcel library using the following codes:
<?php
set_include_path('./RELATIVE_PATH_TO_YOUR/PEAR/' . PATH_SEPARATOR . get_include_path());
require('PHPExcel.php');
require_once('PHPExcel/IOFactory.php');
$excel = new PHPExcel();
$excel->setActiveSheetIndex(0); // select a worksheet
$excel->getActiveSheet()->setTitle('Products'); // name the sheet
$excel->getActiveSheet()->setCellValue('A1', 'Orange');
$excel->getActiveSheet()->setCellValue('A2', '1.30');
$excel->getActiveSheet()->setCellValue('B1', 'Apple');
$excel->getActiveSheet()->setCellValue('B2', '2.10');
$excel->getActiveSheet()->setCellValue('C1', 'Total');
$excel->getActiveSheet()->setCellValue('C2', '=SUM(A2:B2)');
// Save document in the Excel 2007 format
$excelWriter = PHPExcel_IOFactory::createWriter($excel, 'Excel2007');
$excelWriter->save('Products.xlsx');
echo("Products.xlsx created!");
?> - Open the "Products.xlsx" with Excel to see if the xlsx file is fine as planned.
Note: If your PHP file above (to test the PHPExcel library), contains non-English character, you'll need to save it in non-BOM format preferably saved using Notepad++. Here's my post to address this fix.
As for the RELATIVE_PATH_TO_YOUR in red above, RELATIVE is the key. If you PHP file is in a subdirectory and your PEAR's root is in another subdirectory, you need to find a path to refer to PEAR. For example, if your testPHPExcel.php is in the /test directory and your PEAR is in /PEAR directory, you'll need this relative path such as ./../PEAR/.
You are done here! Enjoy!
Install PEAR for Shared Hosting
PEAR is undeniably a good source of PHP code library that will make programmers' life a lot easier. Installing PEAR on Windows/IIS platform is easy especially when you have admin access to your PC/server.
When it comes installing PEAR in a shared hosting environment, admin access is null and there are workarounds that need to be addressed in order to use the PEAR library in the restricted platform.
Here are the steps I use:
Read More »
When it comes installing PEAR in a shared hosting environment, admin access is null and there are workarounds that need to be addressed in order to use the PEAR library in the restricted platform.
Here are the steps I use:
-
Go to http://pear.php.net/go-pear
Copy the content and save it as go-pear.php or other names that you prefer -
Upload the go-pear.php to your server and launch the PHP codes by browsing the php such as logging on to http://yourdomain/yourpath/go-pear.php
-
During setup, you need to find out the path of your PHP executable. You can easily find out by running a PHP like this:
<?php
echo `which php`;
// or echo PHP_BIN if this doesn't work;
?> - After the installation is done, you can now remove the go-pear.php for security reason. You will also be given the absolute path to your PEAR here.
Note: To use PEAR without any problems you need to add your PEAR Installation path (/xxxxxx/xxxxxxxx/xxxxxxx/......./PEAR) to your include_path. - Test your PEAR. You can try the following simple PHP code:
<?php
set_include_path('./PATH_TO_YOUR/PEAR/' . PATH_SEPARATOR
. get_include_path());
require_once 'PEAR.php';
var_dump(class_exists('PEAR'));
?>
If it returns a bool(true), you are all set. Enjoy! :)
Note: You need to make sure the include path is there every time you need PEAR. This is for shared hosting environment. If you have admin access, you can easily skip this by adjusting the PHP.ini file.
Tuesday, February 7, 2012
Image (<IMG>) SRC Dynamic Update Using Script Not Working in IE
If you have HTML code running this dynamically changing image:
This won't work in IE. You need this:
As IE will refer to cache data if it sees the data is the same as the next click.
You can also change to other methods of generating random numbers. As long as the query string is different every time, IE will not refer to cache data and fetch from the server instead.
Read More »
<script> document.getElementById('myID').src="myscript"; </script> HTML: <img src="myscript" id=myID> |
This won't work in IE. You need this:
| <script> var randomNo=Math.floor(Math.random()*10000); document.getElementById('myID').src="myscript?"+randomNo; </script> |
As IE will refer to cache data if it sees the data is the same as the next click.
You can also change to other methods of generating random numbers. As long as the query string is different every time, IE will not refer to cache data and fetch from the server instead.
Subscribe to:
Posts (Atom)